The Swik guides
Two ways in. Quick guides below are one-minute reads with the steps you actually need. In-depth guides are full walkthroughs with screenshots, edge cases, and FAQs.
Pick the format that fits your moment.
Quick guides
One minute. Done.
Click any card to expand. Each is a tight set of steps for the most-asked things — no setup story, no history, just the mechanics.
5 min
Five steps that get you from "I just installed Swik" to "I'm using it." Read top to bottom — each one takes under a minute.
- Install & launch. Drag Swik.app into
/Applications, open it from there. The first run opens an onboarding wizard with a starter set of wedges from your installed apps. - Grant Accessibility. The wizard's last step asks for it. System Settings → Privacy & Security → Accessibility → Swik on. Without this, the hotkey can't be observed globally.
- Pick a hotkey that won't collide. The default is Right Option. Lonely keys (F19, Right Option, remapped Caps Lock) work better than Cmd-modified combos.
- Summon and try it. Press and hold your hotkey. The menu appears. Drag toward a wedge. Release to launch. That's the entire interaction.
- Cancel without firing. Drag back to the small center circle (the dead zone) and release — nothing fires. Or tap Esc at any time.
The menu bar icon (top-right of your screen) is your home base — click it for Settings, Pause, Quit. If you ever lose the Settings window, that's how you reopen it.
Want the full picture? The Start here guide covers vocabulary (wedge, dead zone, dwell, trigger), what to do in your first week, and the troubleshooting table for "menu won't appear."
1 min
Hold is the default. Press and hold your trigger, drag toward a wedge, release to launch. Your gesture and your selection happen in one motion — fastest for muscle memory.
Toggle opens the menu on a tap and leaves it on screen until you click a wedge or tap the trigger again. Better when your hand isn't already on the mouse, when you want to read wedge labels, or when you're using sub-menus you don't have memorized yet.
Switch it in Settings → Hotkey → Trigger Mode:
- Open Settings (menu bar icon, or your hotkey + a click).
- Go to the Hotkey tab.
- Pick Hold or Toggle.
- If you picked Toggle and have Pro, optionally enable Strict wedge selection so a misclick outside the visible wedge doesn't fire.
Want the full picture? The in-depth Trigger Mode guide covers when each mode is faster, how Strict mode prevents misfires, and how to pair Toggle with sub-menus.
2 min
If an app has two or more windows open and you hover its wedge, Swik can fan those windows out as an outer arc. Release on the one you want and that exact window comes forward — no Cmd+`, no Mission Control swap.
Fan out multi-window apps on hover is on by default — so the multi-window arc with icons + window titles already works for you out of the box. The only thing to opt into is Live window previews, which upgrades those title pills to actual thumbnails of each window.
- Open Settings → Menu (the first tab) and find Window Expansion.
- Confirm Fan out multi-window apps on hover is on (it ships enabled).
- Toggle Show live window previews to upgrade pills to live thumbnails. macOS will ask for Screen Recording permission the first time — approve it. Without it, Swik gracefully falls back to the icon + title view.
If the toggle stays off after granting permission, quit Swik and relaunch — macOS occasionally needs a fresh process to pick up Screen Recording rights.
Want the full picture? The in-depth Window Preview guide covers permission edge cases, multi-display behavior, and when to leave previews off.
2 min
Themes live in Settings → Menu → Appearance. Glass (default), Light, Dark, and a Pro tier of custom accents. The theme affects the menu only — never the rest of macOS.
Menu Scale is in Settings → Advanced → Accessibility. A 1.5× or 2× scale makes wedges easier to target on large 4K and 5K displays, and is the right call if you use a stylus or have any motor control concerns.
Layout:
- Use Full Menu for App Actions (Advanced → Layout & Reset) — when an app provides contextual actions, replace the whole ring with those actions instead of nesting them. Flat instead of hierarchical.
- Color-Blind Safe Mode (Advanced → Accessibility) — replaces color-only cues with shape cues (a ▶ for active wedges, a ⌃ for sub-menus).
Want the full picture? The in-depth Customization guide walks through every appearance setting with screenshots.
1 min
Turn it on in Settings → Advanced → Feedback with Keyboard Navigation. Once enabled, while the menu is open:
- 1–8 jumps directly to that wedge.
- ← ↑ → ↓ cycles between adjacent wedges. WASD and HJKL also work.
- Return commits the highlighted wedge.
- Esc dismisses the menu without firing.
Pair this with Toggle trigger mode for a fully keyboard-only flow: tap hotkey → press a number → done. Useful at a café or on a flight where mouse precision is harder.
Want to see how that compares to Cmd+Tab in cold numbers? The app switching speed benchmarks post has the data.
2 min
In Settings → Advanced → Adaptive Menu:
- Frecency Auto-Sort — reorders wedges based on how often and how recently you launch each app. Most-used apps drift to the natural-feeling first slot. Off by default; turn on if you don't mind the menu rearranging itself.
- App-Specific Overrides — pin a wedge to a fixed position, or hide a wedge entirely when a particular app is in the foreground. Great for hiding work apps when the menu fires inside a game, or pinning a "back to mail" wedge always-visible during writing sprints.
If you're new, leave Frecency off until you've used Swik for a week. Spatial memory is built faster against a stable layout.
Adaptive Menu and Profiles work as a pair — Profiles swap the whole menu per context, Frecency reorders within it. The Context-aware profiles post covers how to wire both together.
2 min
Summoning by accident is normal. Knowing how to back out makes the menu feel safe instead of scary.
- Hold mode — drag to the dead zone, release. The small center circle is the safe-cancel. As long as your cursor is inside it on release, nothing fires.
- Esc works in either mode, always. Press it any time the menu is visible.
- Toggle mode — tap the trigger again, or click outside. Same key that opened it closes it. Click-outside is more reliable when Strict mode is on (Pro).
- Sub-menu — drag back through center to step up one level. Or tap Backspace if Keyboard Navigation is enabled. Esc still cancels everything.
If the menu seems to fire when you release in the dead zone, raise Settings → Advanced → Behavior → Dead Zone Radius a notch.
Want the full picture? The Cancel & dismiss guide covers Strict mode interactions, sub-menu navigation, and the troubleshooting table for "Esc isn't working."
3 min
A wedge doesn't have to launch an app. In Settings → Menu, click any wedge and switch its type:
- Custom action (Free) — paste text, open a URL, run an AppleScript, trigger a deep link. Useful for one-line snippets and quick-jump links.
- Apple Shortcut (Pro) — pick any macOS Shortcut by name. Runs via
/usr/bin/shortcuts run, so anything Shortcuts.app can do, your wedge can trigger. Walk-through → - Clipboard history (Pro) — fans out your last 8 text clips as sub-wedges. Click one to paste it into the active app via simulated Cmd+V. Polls every second; only keeps distinct clips. Walk-through →
- Emoji picker (Pro) — six categories (Smileys, Gestures, Objects, Nature, Food, Activities), ~50 each, plus a recent ring. Two-level nav: category wedge → emoji wedge → paste. Walk-through →
Pasting actions need Apple Events permission for Swik to deliver Cmd+V to System Events. Settings → Advanced → Permissions tells you the current status.
1 min
If your mouse has any of: middle click, scroll-wheel click, side buttons, macro buttons — that's the fastest possible Swik trigger. Your hand is already on the device, so press-drag-release happens with zero finger travel.
- Open Settings → Hotkey → Additional Triggers (Pro).
- Click the recorder, then click your mouse button. Swik captures it.
- Both keyboard and mouse triggers can be active simultaneously — pick whichever is closer.
If a button doesn't register, your mouse driver (Logi Options, Steermouse, etc.) is probably intercepting it. In the driver, set that button to "system default" so macOS sees it; then re-record in Swik.
Real-world setup walk-through: Mouse side buttons as your trigger.
1 min
Replaces the right-click Open With… menu with a gesture:
- Click and drag a file in Finder (or any drag source) — keep the mouse held.
- While dragging, press your Swik trigger to summon the menu.
- Drop the file on the wedge for the app you want to open it with.
Swik calls NSWorkspace.open() with the dropped file URL and the slotted app — same code path macOS uses internally for "Open With." Works for any file type the target app accepts; macOS rejects unsupported types as it normally would.
Real-world example: Drag a file onto a wedge to open it.
2 min
Open Settings → About → Configuration. Two buttons:
- Export — saves a JSON file with your slots, hotkey, and appearance. The "Include sub-menus" checkbox controls whether your full hierarchy (Pro) or just the top ring (free-friendly) gets exported.
- Import — pick any previously-exported JSON. Before applying, you get three checkboxes: Slots, Hotkey, Appearance. Uncheck whichever pieces you want to keep from your current config.
Imports go on the undo stack — Cmd+Z in Settings reverts them. The format is stable across versions, so old exports always import cleanly into newer Swik builds.
This is a free feature on both tiers — your setup is yours regardless of license.
Want the full picture? The Import & Export guide covers the JSON schema, sub-menu truncation rules, recipes for moving to a new Mac or version-controlling your config, and what happens when you import a Pro layout onto a free Mac.
3 min
A profile is a complete menu (wedges + appearance). Pro lets you have several, and they swap automatically when context changes. Each profile can have up to four trigger conditions:
- App foreground — fires when a specific app activates (e.g. Figma → design menu).
- Wi-Fi SSID — fires when you join a specific network (e.g. OfficeWiFi → work menu). ~1 second latency.
- External display — fires when a specific monitor connects (e.g. Studio Display → docked-desk menu).
- Time of day — fires within an hour range (e.g. 17:00–23:00 → personal-evening menu). Up to 60s polling latency.
Priority when multiple match: app > Wi-Fi > display > time. Within a tier, the first matching profile in your list wins. Drag profiles to reorder.
Auto-switch is off by default, even on Pro — toggle it on at Settings → Profiles → Auto-switch profiles based on context.
Want the full picture? The Profiles guide covers each trigger's setup, evaluation cadence (60s timer + Wi-Fi event + 3s post-wake), recipes for office/home and docked/laptop and Figma-mode, and a debugging checklist for "why didn't my profile switch?"
2 min
Where sub-menus hide actions until you drill in, an outer ring keeps everything visible at once and gates activation by which inner wedge you've hovered. Up to 3 additional rings around your main menu.
Add a ring: Settings → Menu → expand Outer Rings → click Add ring. Each ring has its own size preset (XS / S / M / L / XL — 40 to 85pt thickness) and gap-from-previous-ring slider (2 to 10pt).
The activation rule: outer wedges are visible but dimmed. They light up when your cursor crosses into their parent inner wedge — so flicking from dead zone to a far outer wedge requires passing through the parent first. This prevents 8 inner wedges × 3 outer slots = 24 mid-flight commit risks.
Best for graduated variants of a parent action (browser → incognito → clear cache). Sub-menus are still better for categorical depth.
Want the full picture? The Multi-ring guide covers each size preset's depth, the gap-and-hysteresis trade-off, recipes (browser variants / comms triage / editor with paste shortcuts / designer's modal), and the exact differences from sub-menus.
3 min
The five built-in themes are unmodified on free. Pro unlocks the tuning layer in Settings → Menu → Appearance:
- Opacity (0.3 – 1.0) — wedge background opacity. Floor of 0.3 keeps the menu visible.
- Border (0.5 – 3.0pt) — wedge outline thickness.
- Blur (0 – 1.0) — vibrancy/frost intensity behind wedges.
- Grayscale (0 – 1.0) — desaturation applied to app icons.
- Icon only toggle — hide labels for tighter layouts.
- Four color pickers — Highlight (selected wedge tint), Text, Border, Dead zone.
Customizations are saved per theme — so a tuned Glass and a tuned Dark coexist without overwriting each other. To revert: switch themes, or use Advanced → Layout & Reset → Reset to Defaults (heavy-handed; resets all UX).
Want the full picture? The Theme customization guide covers each control's exact range, recipes for matching brand palettes (Linear purple, Solarized, OLED battery saver, low-vision high-contrast), and the export-then-experiment workflow.
3 min
First-run flow: Welcome (set hotkey, learn vocabulary) → Setup (pick a template — Productivity, Creative, Development — or start empty) → Permissions (grant Accessibility). Templates auto-resolve to apps you actually have installed.
After the wizard closes, an interactive tutorial overlay fires the real menu and walks through four steps: showing the menu, selecting a wedge, releasing to launch, and the dead zone.
Three independent surfaces you can re-run later, all from Settings → Advanced → Onboarding:
- Re-run setup wizard — full 3-step flow again. Confirming a template overwrites your wedges — Export first if you want a backup.
- Replay tutorial — skip the wizard, just run the 4-step coachmark on your existing menu.
- Open usage guide — static reference card with shortcuts and patterns. Useful as a quick reminder.
Want the full picture? The Onboarding wizard guide covers what each step does, what happens to your wedges on re-run, the skip behavior, and how the wizard / tutorial / usage guide differ.
5 min
The most common things to check, in priority order:
- Menu won't appear — System Settings → Privacy & Security → Accessibility → toggle Swik on. Quit and relaunch.
- Worked yesterday, not today — usually a macOS update revoked Accessibility, Screen Recording, or Apple Events. Re-grant in System Settings.
- Wrong wedge fires — Advanced → Behavior → raise Selection Stability.
- Lost Settings window — click the menu bar dot → Settings.
- Pro features locked despite purchase — Settings → About → Restore Purchases.
Want the full lookup? The Troubleshooting page covers every symptom organized by what you're experiencing — menu won't open, can't dismiss, hotkey collisions, performance, layout, action wedges, Pro issues, full reset.
2 min
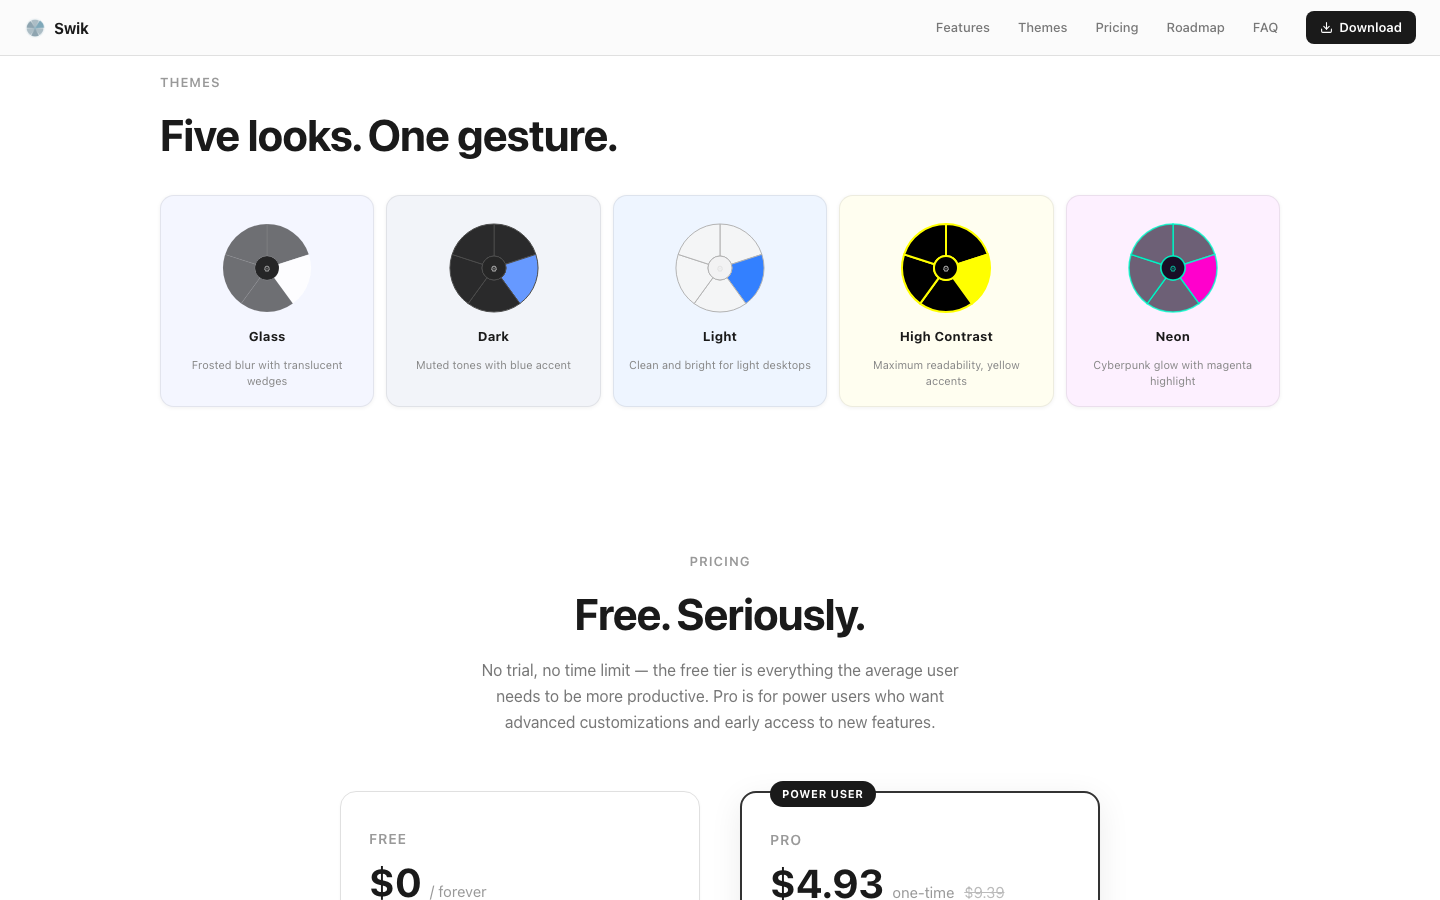
Free ($0, forever): 5 wedges in 1 ring, hold/toggle triggers, custom hotkey, Window Expansion (with live previews if you grant Screen Recording), all 5 built-in themes (Glass / Dark / Light / High Contrast / Neon), keyboard navigation, frecency, drag-to-slot, import/export, custom actions (URL/paste/AppleScript), 1 profile.
Pro ($9 one-time): sub-menus, additional rings, mouse-button triggers, Strict wedge selection, theme customization (opacity, blur, color pickers, icon grayscale, hide labels), Apple Shortcuts wedges, Clipboard history, Emoji picker, multi-action mode (close/quit/etc), multiple profiles with context triggers, beta channel.
No subscription, no nag wall, no time-limited trial — the free tier is the trial. If you find yourself wanting sub-menus or action wedges, that's the signal Pro is worth the $9.
Want the full table? The Free vs Pro page breaks down every feature row by row, plus how upgrade/downgrade/restore works.
From the blog
Browse all →Context-aware profiles
Wi-Fi, monitor, and time-of-day rules that swap your whole menu when your moment changes.
Read on the blog → WorkflowApple Shortcuts in your wedges
Wire any macOS Shortcut to a wedge and turn the radial menu into a custom control surface.
Read on the blog → CompareSwik vs BetterTouchTool vs Raycast
Three launcher philosophies, one honest comparison. Which one fits your workflow?
Read on the blog →In-depth guides
When you want the full story.
Each of these is a standalone walkthrough — screenshots, edge cases, FAQ, the parts the quick guide skipped. Start here when you're settling in for an evening, not for a 30-second answer.
Start here — your first 5 minutes
Install, Accessibility, hotkey, first wedge, summon, dismiss. Vocabulary, what to do in your first week, and a troubleshooting table.
Read the guide → Guide · featureCancel & dismiss the menu
Every way to back out without firing — dead zone, Esc, click-outside, tap-trigger-again, and stepping back from a sub-menu.
Read the guide → Guide · referenceTroubleshooting — when something feels off
Symptom → cause → fix, organized by what you're experiencing. Every common issue from "menu won't open" to "Pro features stopped working."
Read the guide → Guide · referenceFree vs Pro — what's in each tier
Every Swik feature, what's free, what's Pro, and why the line falls where it does. Audited against the actual app code.
Read the guide → Guide · featureImport & Export — back up and share your setup
JSON in, JSON out. Selective import (slots / hotkey / appearance), sub-menu truncation, recipes for moving to a new Mac.
Read the guide → Guide · featureThe onboarding wizard — first run, re-runs, tutorial
What the wizard does, the post-wizard tutorial overlay, and how to re-run any of it later without losing your existing setup.
Read the guide → Guide · featureProfiles & context-aware switching
Four trigger types, priority order when they compete, the evaluation cadence, recipes for office/home/docked/Figma-mode, and a debugging checklist.
Read the guide → Guide · featureMulti-ring layouts — concentric outer rings
How outer rings differ from sub-menus, the size and gap controls, the activation-gating rule, and recipes for 16+ actions in one gesture.
Read the guide → Guide · featureTheme customization — opacity, blur, colors
Every Pro-unlocked tuning slider with its actual range, plus four color pickers and recipes for matching brand palettes.
Read the guide → Guide · featureTrigger Mode in depth — Hold, Toggle, Strict mode
Why each mode exists, how they feel under different inputs, and when Strict wedge selection saves you from misfires.
Read the guide → Guide · featureWindow Preview & Window Expansion
How the multi-window arc works, the Screen Recording permission, fallback behavior, and multi-display quirks.
Read the guide → Guide · featureCustomization — themes, scale, color-blind, accents
Every appearance and accessibility setting, what it changes, and which combinations look best on Retina vs 4K.
Read the guide → Guide · tourThe full Settings tour — every tab, every toggle
A guided walk through Menu, Hotkey, Profiles, Advanced, Analytics, and About. Read once, never get lost again.
Read the guide → Blog · setupSetting up Swik for the first time
Install, Accessibility permission, picking a trigger, and the troubleshooting table for "the menu won't appear."
Read on the blog → Blog · featureContext-aware profiles
Wi-Fi, monitor, and time-of-day rules that swap the whole menu when your moment changes.
Read on the blog → Blog · workflowApple Shortcuts in your wedges
Wire any macOS Shortcut to a wedge and turn the radial menu into a control surface.
Read on the blog → Blog · workflowClipboard history in a wedge
Last eight clips, one flick away. How the wedge fans out and how paste works under the hood.
Read on the blog → Blog · workflowThe radial emoji picker
Recent ring, six categories, two-level navigation — faster than Ctrl+Cmd+Space.
Read on the blog → Blog · workflowDrag a file onto a wedge to open it
"Open with…" without the right-click. Pick up a file, summon Swik, drop on the app.
Read on the blog → Blog · setupKarabiner Hyperkey as your trigger
Remap Caps Lock into a Hyper key, bind Swik to it, and never collide with another shortcut again.
Read on the blog → Blog · setupMouse side buttons as your trigger
The fastest trigger in the world if your mouse has them — your hand is already there.
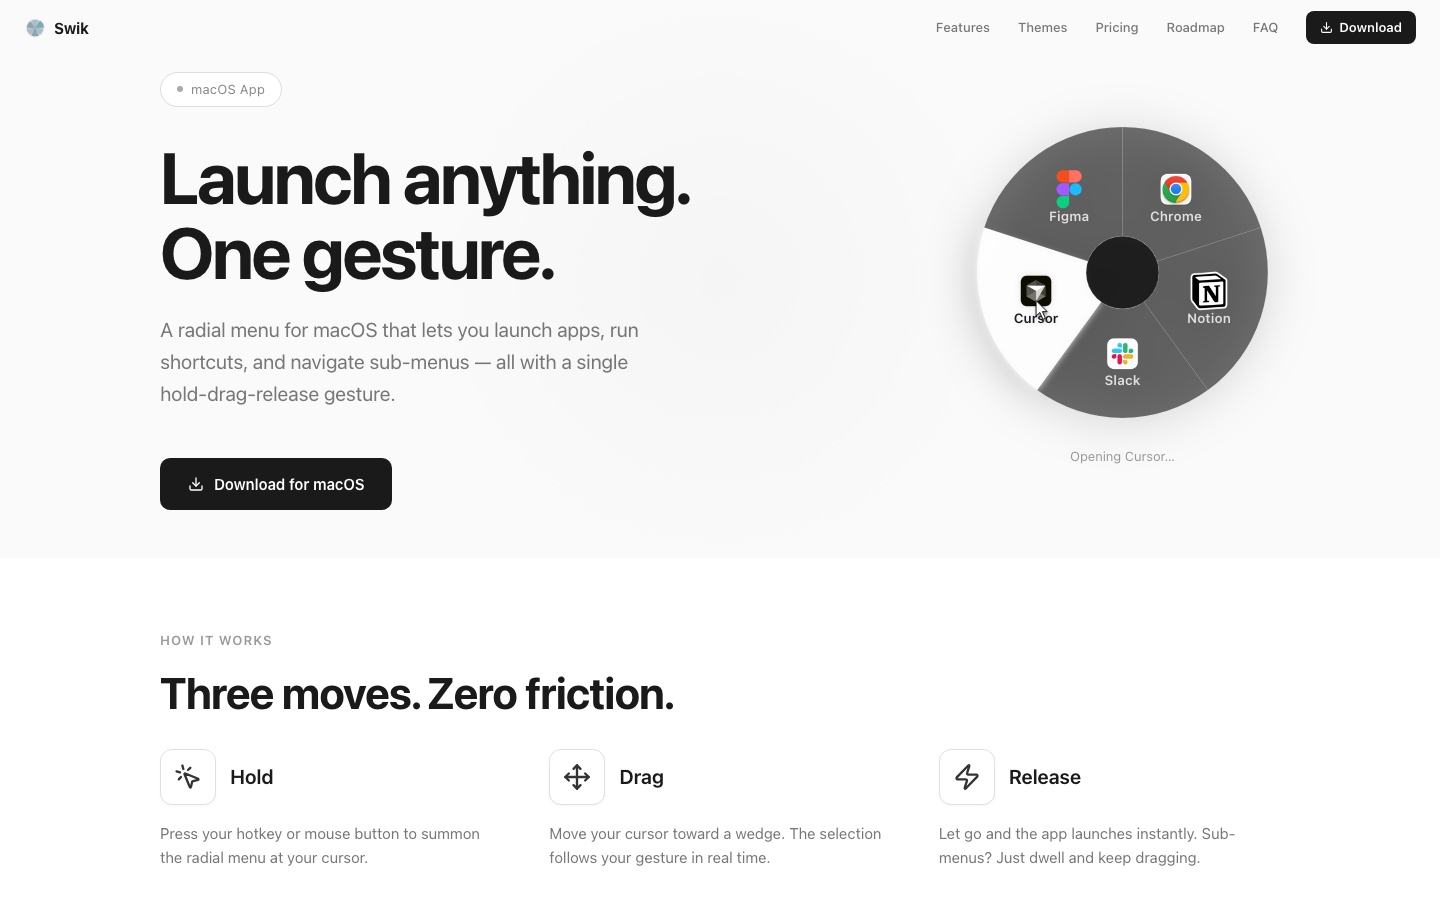
Read on the blog →Swik — a radial menu for macOS
Launch anything. One gesture. Free for five wedges, $9 one-time for unlimited. Requires macOS 14 Sonoma or later.
Download for macOS