Customization — themes, scale, accessibility
Swik's defaults are calibrated for a 14" Retina laptop with a trackpad. If that's you, you can probably skip this guide. If you're on a 5K display, a Studio Display with a stylus, an external mouse, or you have any color-vision or motor differences, the right settings here can make the menu feel like it was designed for your hand specifically.
Themes
Themes change the menu's chrome — the wedge background, the divider, the highlight color — and nothing else. Your wallpaper, your menu bar, your other apps stay exactly as macOS draws them.
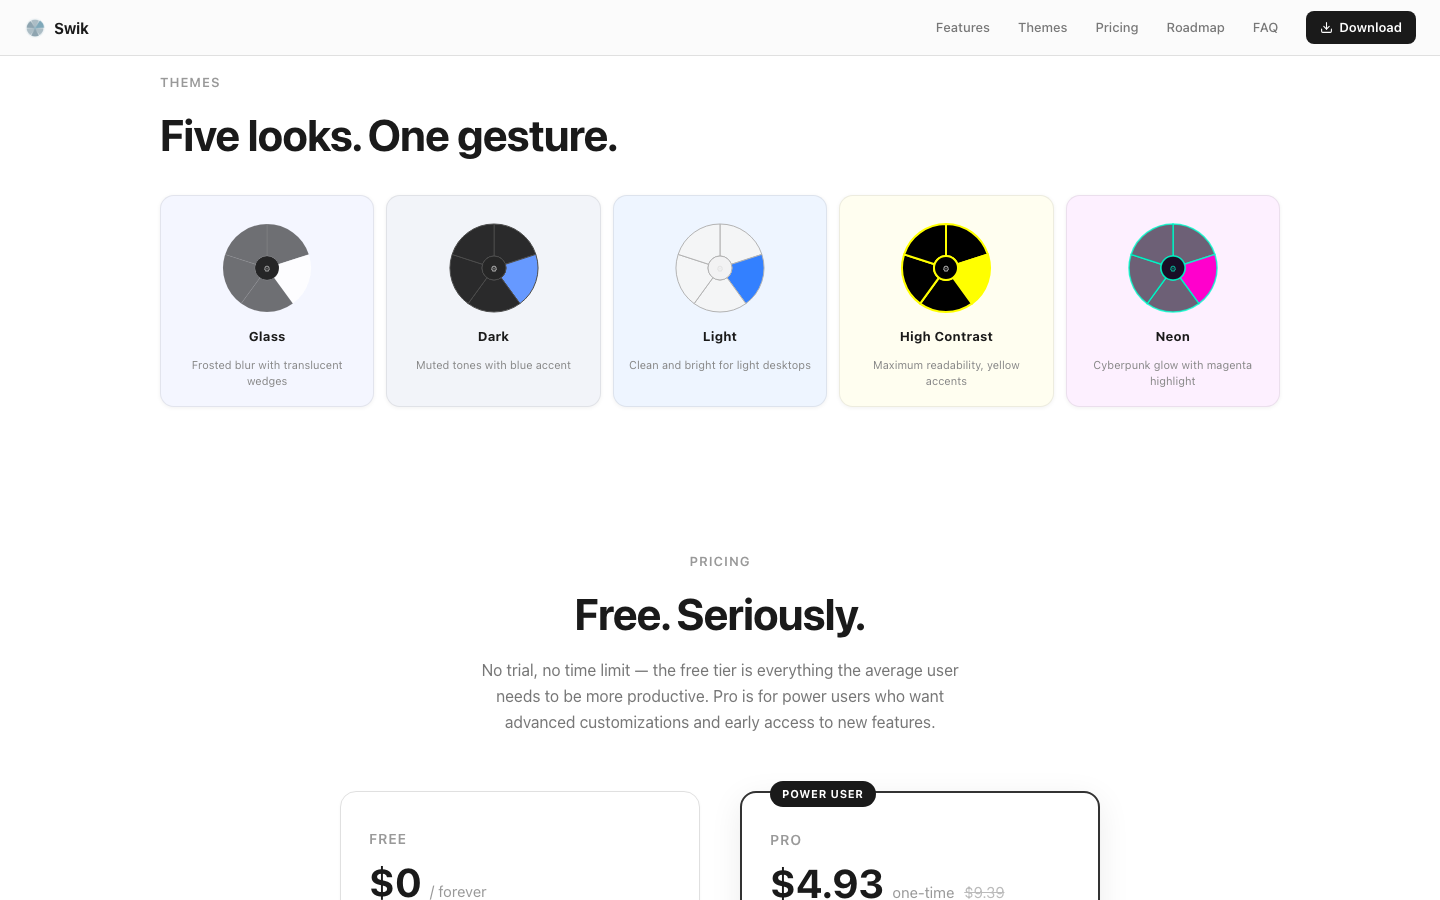
Settings → Menu → Appearance. Five built-in themes, all available on free:
- Glass — the default. Translucent dark wedges with a subtle white border. Reads well over any wallpaper because it's already dark+frosted.
- Dark — opaque near-black wedges, light text. Best for OLED users squeezing power, or for late-night sessions.
- Light — opaque cream wedges, dark text. Best on consistently light backgrounds (writing apps, IDE in light mode).
- High Contrast — saturated yellow border and highlight on solid black. Designed for low-vision accessibility — pairs well with Color-Blind Safe Mode and a 1.5× Menu Scale.
- Neon — translucent dark with cyan accents and magenta highlight. Loud on purpose; pairs with Creative-style workflows.
If you can't decide, leave Glass on. It's the variant most users keep after a week of trying others.
Customizing a theme (Pro) — once you've picked a preset, Pro unlocks per-theme sliders to tune opacity, border width, blur intensity, icon grayscale, plus a hide-labels toggle. Below those are color pickers for highlight, text, border, and dead-zone — useful if you want the menu to match a brand palette across your toolchain. The free tier gets the presets unmodified, which is plenty for most setups.
Menu Scale
Settings → Advanced → Accessibility → Menu Scale. A multiplier from 1.0× (default) to 2.0×.
What this controls: the physical size of the entire radial menu and — importantly — the hit-test zones too. So at 1.5× the wedges aren't just visually larger; the area your cursor has to land in to hit each one is also 1.5×. This makes a real difference for:
- 4K and 5K displays. A wedge that's comfortable at 1.0× on Retina becomes pixel-tiny on a Studio Display. Bump to 1.3× or 1.5×.
- Stylus / pen input. Pens are precise but landing on a 60px target is harder than mousing onto a 60px target. 1.5× makes it forgiving.
- Motor control concerns. 2× is the right call. Combined with a longer Dwell Time it makes the menu fully usable without precision micro-motions.
- Showing the menu in a screencast. Bump to 1.5× so viewers' compressed video can read the labels.
Color-Blind Safe Mode
Settings → Advanced → Accessibility → Color-Blind Safe Mode.
By default, Swik signals state with color: highlighted wedges glow green, sub-menu wedges have a subtle accent. Color-blind safe mode replaces those color cues with shape cues — a small ▶ on active wedges, a small ⌃ chevron on sub-menus. Color is still present (a darkened frame around the wedge tells you it's pressed); the shapes are an additional, redundant signal.
Turn it on if you've ever found yourself counting wedges to figure out which one was highlighted. It's cosmetic-only — no behavior changes.
Behavior tuning — Dwell, Dead Zone, Magnetism, Stability
Settings → Advanced → Behavior. Four sliders that control the raw physics of how Swik interprets your cursor:
| Slider | What it does | When to raise it |
|---|---|---|
| Dwell Time | How long the cursor must hover a wedge before it counts as selected | If you frequently misfire or fire the wrong wedge while flicking past — slower hand, more deliberate gestures |
| Dead Zone Radius | The center circle where no wedge is active — your safe-cancel zone | If your hand often drifts back to center on accident; making the dead zone larger gives you more "safe" space |
| Wedge Magnetism | How strongly a wedge pulls the cursor once you cross the dead zone | If wedges feel hard to land on; a larger value snaps you in faster |
| Selection Stability | How far across an angular boundary you must travel before the next wedge takes over | If you sometimes commit a neighbor wedge by accident; stability adds hysteresis to the boundary |
The fastest way to get a feel for these is to use the Interaction Presets at the top of the same tab — Default, Fast, Precise. Pick one, use the menu for a day, then nudge the individual sliders if a specific behavior still bothers you.
Smart Selection — Predictive, Type-to-Filter, Force Touch
Settings → Advanced → Smart Selection. Three independent toggles:
- Predictive Highlighting — Swik watches your cursor's velocity and direction and pre-highlights the wedge it thinks you're heading toward, before you actually cross its boundary. Makes the menu feel anticipatory and fluid. Worth keeping on; turns off cleanly if you find it noisy.
- Type-to-Filter — start typing a letter while the menu is open and it filters wedges by name. Useful when your menu has 12+ items and you remember the name but not the position. Works in Hold mode too — keep your trigger held, type, the matching wedges glow.
- Force Touch Sensitivity — on Force Touch trackpads, a deep press instantly commits the hovered wedge, bypassing dwell time. Lets the very fast users go faster without changing their dwell setting.
Haptic, Sound, Keyboard Navigation
Settings → Advanced → Feedback. Three independent toggles for sensory output:
- Haptic Feedback — vibrates the Force Touch trackpad on hover and commit. No effect on non-Force Touch trackpads or mice.
- Sound Effects — subtle system UI sounds for hover, commit, and sub-menu navigation. Default off; turn on if you find yourself second-guessing whether a click registered.
- Keyboard Navigation — enables arrow keys, WASD, HJKL, number keys 1-8, Return, and Escape while the menu is open. Pair this with Toggle trigger mode for a fully keyboard-only flow.
Recipes — common configurations
| Setup | Theme | Scale | Behavior preset | Other |
|---|---|---|---|---|
| 14" MacBook Pro, trackpad | Glass | 1.0× | Default | Predictive on, Haptic on |
| 27" 5K display, mouse | Glass or Dark | 1.3×–1.5× | Default or Fast | Magnetism +1 step |
| iPad-as-display via Sidecar with stylus | Light | 1.5× | Precise | Dead Zone +1 |
| Motor-control accessibility | Glass | 2.0× | Precise | Color-Blind Safe on (redundant cues), Sounds on, Toggle mode |
| Late-night writing on OLED | Dark | 1.0× | Default | Sounds off, Haptic off |
Reset to defaults
Settings → Advanced → Layout & Reset → Reset to Defaults. Restores every value in the Advanced tab to factory settings. Your menu configuration (apps, wedges, sub-menus) and your hotkey are not affected — only Advanced behavior. Use this if your tweaks have made the menu feel weird and you don't remember what you changed.
Frequently asked questions
Will custom themes ever come to free?
Five built-in themes (Glass, Dark, Light, High Contrast, Neon) are the shipped set, and all five are free. Theme customization — opacity, blur, border, color pickers — is Pro because that's the level of polish that matters mostly to users committed to a particular palette across their toolchain.
Does Menu Scale work for sub-menus too?
Yes — the multiplier applies to the entire menu hierarchy, including the outer ring shown on Window Expansion. Hit-test zones scale with the visuals, so a 1.5× menu has 1.5× larger targets all the way through.
Can I change the icon size without scaling the whole menu?
Not currently — icon size is proportional to wedge size. If wedges feel cramped, scaling up is the answer; if they feel too large, scaling down is. We may add an icon-only scaler later if there's demand.
What's the difference between Predictive Highlighting and Wedge Magnetism?
Magnetism is geometric — once your cursor is past the dead zone, it pulls toward the nearest wedge centerline. Predictive is temporal — it watches velocity to guess where your cursor will be in 50ms. Both can be on; they don't fight.
Swik — a radial menu for macOS
Launch anything. One gesture. Free for five wedges, $9 one-time for unlimited. Requires macOS 14 Sonoma or later.
Download for macOS